Count visits
Improve facility management by taking into account actual usage based on real time measurements.
This experiment shows how a LoRa™ sensor can count visits to optimise cleaning based on usage rather than rigid fixed schedules.
The experiment
Prerequisites
For the prerequisites below, please check the quick start page!
- Have your LoRa™ device connected
- Arduino IDE installed
- SODAQ Mbili library installed
- AllThingsTalk library installed
- AllThingsTalk Maker mobile app on your smartphone
Sketch implementation
Each time the door opens a counter is incremented locally on your LoRa device.
Every 30 seconds, if the count has changed, it will be sent to your AllThingsTalk account.
As soon as a count of 20 is reached, a notification is sent out to remind you that cleaning is in order.
A pushbutton on the device allows you to reset the count when cleaning is done.
This can also be seen as validation that the cleaning crew has actually visited the facility.
Schematic and ingredients
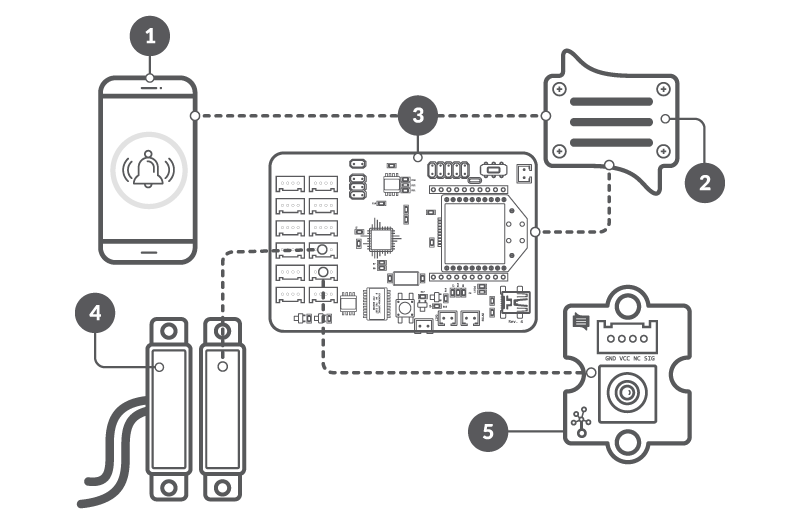
- SODAQ Mbili board with LoRa™ module
- Screw terminal
- Magnetic door switch
- Push button
- Smartphone with AllThingsTalk Mobile
Basic knowledge about how to work with a SODAQ Mbili is a must, if you’ve never used one before we suggest you take a look at the quick start page first!
Building Plan
- Collect hardware
- Attach LoRa™ module & antenna (without the range is very limited)
Before we can hook up the screw terminal with the magnetic door switch, we need to add a resistor. This is to prevent the values to jitter
when the door is open. In electronics this is know as a pull down resistor. The image below shows us how to connect the door switch.
- Connect magnetic door switch to screw terminal
- Door switch to VCC and D1 on the terminal
- Resistor between GND (ground) and D1

- Connect screw terminal to D4/D5*
- Connect button to D20/D21*
- Connect SODAQ Mbili to your computer through USB
- Turn power switch on the Mbili to ON
For more information on the Sodaq Mbili and connector pin numbers, please check this page.
Setup sketch
Now it’s time to upload the sketch to our device. Open the Arduino IDE.
- Under Tools > Board, select the SODAQ Mbili
- Open the
countVisits.inofile from the/ATT_LoRa_IOT/examples/experiments/countVisitsfolder. This should open thecountVisits.inosketch as well as an emptykeys.hfile
uint8_t DEV_ADDR[4] = {};
uint8_t APPSKEY[16] = {};
uint8_t NWKSKEY[16] = {};
Next we will add our device keys to this keys.h file.
Add device keys
Get your device keys from AllThingsTalk
Add these keys to the keys.h file of your sketch.
These keys however are unique for your device, meaning the
keys.hfile will be the same for all projects. You can copy it to your harddisk once and copy it from there to your project folder each time.
Run the sketch
When your keys are set, it’s time to test.
- Upload and run the sketch
- After uploading, turn the power switch OFF and back ON
You can now watch the values change in AllThingsTalk Maker
Alternatively, you can open the Tools > Serial monitor of the Arduino IDE.
- Make sure you select the correct COM port to listen (under Tools > Port )
- When the monitor is open, make sure the Baud rate is set to 57600
Next steps
Configure automation rule
We want to get notified with the visit count:
then send notification
For a simple rule like this, we can use the rules wizard.
- Click your name in the top right corner to enter the main menu
- Select Your rules
- Click + New Rule to create a new rule
- Select Use rules wizard when creating a simple rule
Time to create our rule!
The name of your device upon creation is LoRa prototype.
- Select Device state change
- Continue
- Select your device from the dropdown menu
- Select the countVisits asset
- Select Compare to some value
- Select Greater than (>) as Value to compare
- Enter 20 as value
- Continue
- Select Notify me
- Continue
- Enter your notification message
- Save and start
- Enter a name for your rule and save
That’s it! When your asset receives a count above 20, you now will get notified!
The count only resets when the button is pushed, meaning cleaning is done.
Create pinboard
To visualise our date, we will create a pinboard. For more information on pinboards, please check how to use pinboards.
- Select the Pinboards icon in the top left
- Select the New pinboard icon
- Select the Arrange pinboard icon to enter the pinboard edit mode
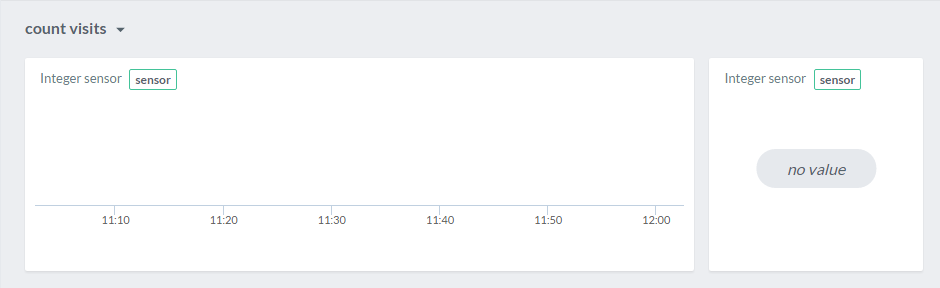
Now we will pin a control (visual representation) for our Integer Sensor asset to visualise the amount of visits.
- Select Pin control
- Select your LoRa device and the Integer Sensor asset
- Select an appropriate control, for example Historical Chart or Label
- Click Pin control
You can pin the same asset multiple times. Pinning the asset to visualise it both as a historical chart and a label may give you an even better look!