Guard your stuff
Do you want to get notified when someone is moving things precious to you ?
This Experiment shows how a LoRa™ device can be used to detect unexpected movement
of an object and send out notifications to its owner. Furthermore, the experiment shows how you can track the object using its GEO location.
The experiment
Prerequisites
For the prerequisites below, please check the quick start page!
- Have your LoRa™ device connected
- Arduino IDE installed
- SODAQ Mbili library installed
- AllThingsTalk library installed
- AllThingsTalk Maker mobile app on your smartphone
Sketch implementation
If the accelerometer senses movement, the device will send out GPS coordinates every 15 seconds. If we have our lock turned on, movement will trigger a notification which will be visible in the AllThingsTalk Developer Cloud and on our Smartphone.
If the lock is turned off, nothing will happen, regardless of any movement of the device. If movement stops, last known coordinates will be sent and then sending of coordinates stops until there is movement again.
Schematic and ingredients
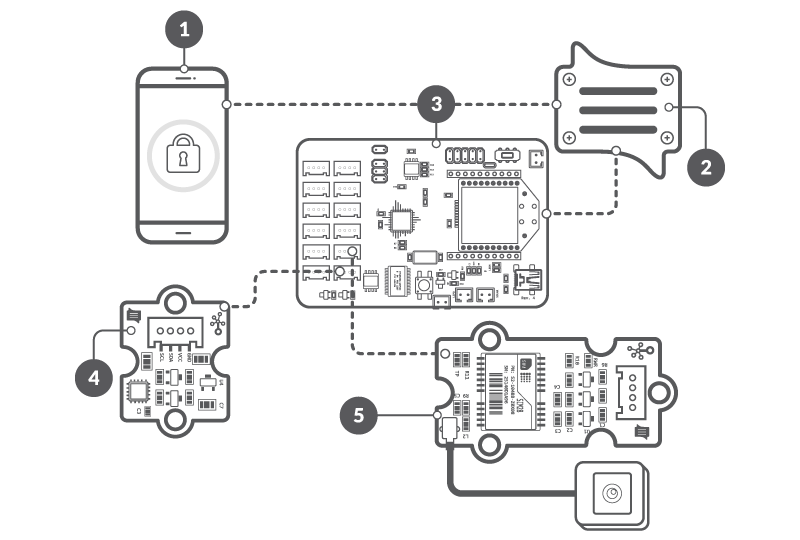
- SODAQ Mbili board with LoRa™ module
- 3-axis digital accelerometer
- GPS module
- Smartphone with AllThingsTalk Mobile
Basic knowledge about how to work with a SODAQ Mbili is a must, if you’ve never used one before we suggest you take a look at the quick start page first!
Building Plan
- Collect hardware
- Attach LoRa™ module & antenna (without the range is very limited)
- Connect 3-axis digital accelerometer to SCL/SDA (I2C socket)
- Connect GPS module to D20/D21
- Connect SODAQ Mbili to your computer through USB
- Turn power switch ON
For more information on the Sodaq Mbili and connector pin numbers, please check this page.
Make sure you have good GPS coverage. Indoors can be a problem in certain cases.
Setup sketch
Now it’s time to upload the sketch to our device. Open the Arduino IDE.
- Under Tools > Board, select the SODAQ Mbili
- Open the
guardYourStuff.inofile from the/ATT_LoRa_IOT/examples/experiments/guardYourStufffolder. This should open theguardYourStuff.inosketch as well as an emptykeys.hfile
1 | uint8_t DEV_ADDR[4] = {}; |
Next we will add our device keys to this keys.h file.
Add device keys
Get your device keys from AllThingsTalk
Add these keys to the keys.h file of your sketch.
These keys however are unique for your device, meaning the
keys.hfile will be the same for all projects. You can copy it to your harddisk once and copy it from there to your project folder each time.
Run the sketch
When your keys are set, it’s time to test.
- Upload and run the sketch
- After uploading, turn the power switch OFF and back ON
You can now watch the values change in AllThingsTalk Maker
Alternatively, you can open the Tools > Serial monitor of the Arduino IDE.
- Make sure you select the correct COM port to listen (under Tools > Port )
- When the monitor is open, make sure the Baud rate is set to 57600
Next steps
Create virtual asset
We now need to create and asset to represent our lock.
- Click New asset on the device page
- Select Virtual
- Enter a name for your lock (let’s call it lock for simplicity)
- Hit the arrow to create our virtual asset
The name is fixed. You can however give the asset your own local label in the asset detail page. This local label is what will be displayed in the dashboard. By default this label is set to the asset name.
Change lock profile
Now we will change the profile of our lock to boolean
- On the device page, select your lock
- Change the profile field type to boolean
The profile should now look like
1 | { |
Configure automation rule
We want to get notified when we have the lock turned on and our device is moving. Our rule will have to look like this:
then send notification
For our specific experiment and assets
Then notify me on mobile and web
We will use the json editor to write this complex rule
Setting up a complex automation rule
To set up a complex rule, we need to enter the json rule editor.
- Click your name in the top right corner to enter the main menu
- Select Your rules
- Select + New Rule to create a new rule
- Select Use JSON rule creator when creating a more complex rule
A skeleton for a basic When-then rule is set by default. You will see each part (equation) contains 3 fields:
leftthe lefthand side of the equation containing the asset detailsopthe operator usedrightthe righthand side of the equation containing a certain value
The first condition of our rule does not need a left, op and right part in our json as it triggers on any change. The second condition should only trigger when the lock is set to true so we do need to specify this condition.
Set JSON RULE DEFINITION
For our rule, start by replacing the entire JSON RULE DEFINITION with the one below.
[
  {
    "when": [
      {
        "device": "LoRa_Device_id",
        "service": "asset",
        "sensor": "LoRa_Binary_Asset_id"
      },
      {
        "and": {
          "left": {
            "device": "LoRa_Device_id",
            "service": "asset",
            "sensor": "Virtual_lock_Asset"
          },
          "op": "==",
          "right": true
        }
      }
    ]
  },
  {
    "then": [
      {
        "left": {
          "service": "notify",
          "actuator": "user//push,web"
        },
        "op": "=",
        "right": "Someone is tampering with your lock"
      }
    ]
  }
]
Don’t forget to give your rule a name on top!
Fill in the device id and asset id for both the Binary Asset and Virtual lock Asset.
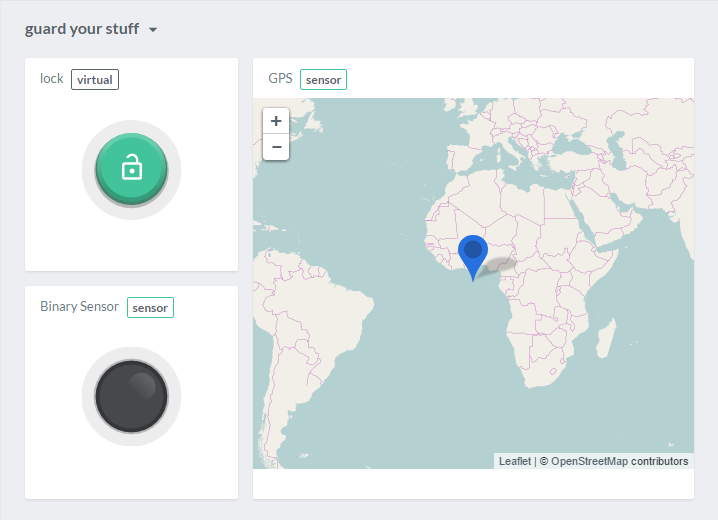
Create pinboard
To visualise our date, we will create a pinboard. For more information on pinboards, please check how to use pinboards.
- Select the Pinboards icon in the top left
- Select the New pinboard icon
- Select the Arrange pinboard icon to enter the pinboard edit mode
Now we will pin a control (visual representation) for each of our assets (Binary Sensor, GPS and our virtual lock).
- Select Pin control
- Select your LoRa device and one of the above mentioned assets
- Select an appropriate control
On-Offfor the Binary Sensor assetLock/Unlockfor the virtual lock assetmapfor the GPS asset
- Click Pin control
Repeat this for each of our assets. You can also edit the size of your controls and set some other options, for example the default zoomlevel of the map.