In this article
LoRaWAN™ based Track-and-Trace

This step by step guide will help you set up your first working Sodaq ONE LoRaWAN experiment. It will show how to send data from the Sodaq ONE to the AllThingsTalk cloud, using the onboard pushbutton.
Prerequisites
Hardware
- Sodaq ONE board
Software
- AllThingsTalk Maker account; sign up here
- Arduino IDE installed
- AllThingsTalk Arduino LoRaWAN SDK installed
- AllThingsTalk Arduino LoRaWAN PDK installed
- Sodaq ONE board support in your Arduino IDE; follow this get started guide.
If you are using the AllThingsTalk Product kit, the Arduino LoRaWAN SDK and PDK are already installed on your Sodaq ONE.
To install the Arduino LoRaWAN PDK, go to Sketch > Include library > Add .ZIP library in your Arduino IDE. Select the arduino-lorawan-pdk-master .zip file you just downloaded and click open.
Alternatively, unzip the file and copy the contents to your Arduino library folder.
Our first program
Create a device
First we need to create our device.
- Log in to AllThingsTalk Maker
- Navigate to the ground in which you want to create your device
If you just created a new account, you will have a default ground called playground. You can use this ground to create your device or create a new ground if you want.
- Hit the + CONNECT A DEVICE button
- Select LPWAN devices
- Select LoRaWAN Track-and-Trace Product Kit
- Select the Network Service Provider of your preference
- Enter the respective keys. For more info on creating a device and obtaining keys from your NSP, check the corresponding section in networks
- Hit SAVE
Set up sketch
- Connect the Track-and-Trace device to your computer over USB
- Open your Arduino IDE
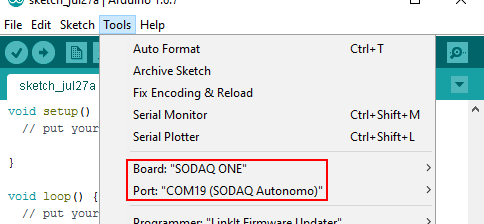
- Go to Tools > Board: and select the SODAQ ONE board
- Under Tools > Port select the USB port to which your device is connected

- Open the example you want to run. There are two ways to send your data
Fixed containers
- Under File > Examples > arduino-lorawan-pdk > container open the
pushbutton-containersexample sketch
- Go to your device in AllThingsTalk Maker
- Under SETTINGS > Payload formats, make sure Use ABCL is unchecked
Binary payload
- Under File > Examples > arduino-lorawan-pdk > binary-payload open the
pushbutton-binary-payloadexample sketch
- Go to your device in AllThingsTalk Maker
- Under SETTINGS > Payload formats, make sure Use ABCL is checked
- Copy/paste the content of
push-button-payload-definition.jsonin the textarea. You find this file in the examples folder of the arduino-lorawan-pdk - Hit Save
Enter keys
Next we need to add these keys of our device (dev addr, apps key and nwks key) to our example sketch, so it knows where to send its data. You can find them under SETTINGS > Connectivity of the device you just created.
- Fill in your keys in the
keys.hfile as shown below
1 | uint8_t DEV_ADDR[4] = {0x08, 0x1B, 0x3A, 0x74}; |
We are now ready to upload and run our sketch!
Run the example
Simply hit the upload icon in the Arduino IDE. This will save the sketch, compile it and upload it to your Arduino.
After uploading, you might need to flip the power switch on the SODAQ Mbili OFF and back ON to make sure the Mbili reboots and starts up our sketch.
Try press the Button. This should send its state to AllThingsTalk and update the Binary Sensor accordingly.
Alternatively, you can also open the Tools > Serial monitor of the Arduino IDE. This can be very useful when debugging your own sketches.
- Make sure you select the correct COM port to listen (under Tools > Port )
- When the monitor is open, make sure the Baud rate is set to 57600
- Select the
pushbutton-payload-builderexample in the File > Examples > arduino-lorawan-pdk folder - Set the payload definition in the SETTINGS tab under your device in Maker to match the content of the
pushbutton-payload-definition.jsonfile
More examples
As a next step, please try the Track & Trace demo
Sodaq ONE support
- Install the Arduino IDE and SODAQ One board using their excellent get started guide.
How to use battery power
The LoraWAN™ based Track-and-Trace device has been designed to run for a long period on a battery.
The device has an onboard charging circuit for a LiPo battery and solar panel, so besides powering your device with the USB cable, you can also connect a battery and even a solar panel.
LiPo battery
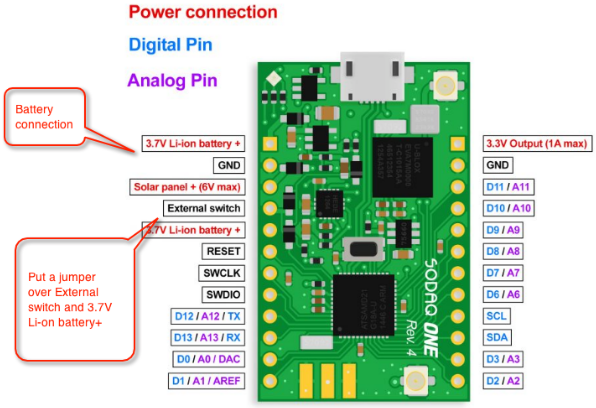
Solder the included PIN headers onto the board and connect your LiPo Battery and/or Solar Panel following the PIN definitions
The picture below shows how the battery can be connected:
- The Battery should be connected between pins
3,7V Li-on battery + andGND - A jumper must been placed between pins
External switch and3.7 Li-ion battery +

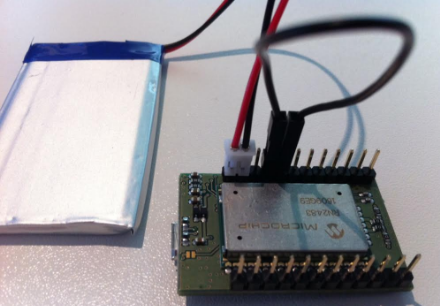
The image below shows the jumper (or small wire to connect both pins) and the battery.

Instead of using the jumper for the EXTERNAL_SWITCH, you can accomplish the same by setting
ENABLE_PIN_IOtoHIGHin your sketch.
Optional, the included Solar panel can be connected between the pins
For more information on using a battery, please visit http://support.sodaq.com/sodaq-one/battery/.
