Light Sensor
In this example we will connect the Grove Light Sensor to your Raspberry Pi to measure environmental lighting and display the result in AllThingsTalk Maker.
If you are new to using a Raspberry Pi, we suggest you try the basic example on the previous page first.
Prerequisites
Hardware
- A Raspberry Pi
- Rapsberry Pi Grove shield
- Grove Light sensor
- 8GB SD card
Software
- AllThingsTalk Maker account; sign up here
- AllThingsTalk Python SDK installed on your Raspberry Pi
- Grove Pi library installed on your Rapsberry Pi
No need to install the sdk and Grove Pi if you are using the AllThingsTalk Raspberry Pi kit. The SD card comes pre-installed.
If you are using your own Raspberry Pi, you can clone the AllThingsTalk SDK to it using
git clone git://github.com/allthingstalk/python-sdk.git.
Next install the sdk by browsing to the foldercd python-sdkand thepip3 install .command.
To install Grove Pi support, please follow these instructions.
- PuTTy (or similar tool) to set up a SSH connection with the Raspberry Pi
An alternative to using a SSH client is hooking up a screen and keyboard to your Raspberry Pi.
Setup
Hardware
- Insert the SD card into your Raspberry Pi
- Attach the Grove shield to your Raspberry Pi
- Connect the Grove light sensor to the A0 connector on the shield
- Connect your Raspberry Pi to the internet with an ethernet cable
- Connect the power supply to the mains and your board
Create a device
If you did the basic example on the previous page, you can re-use the same device and credentials.
If not, please check the create a device and enter credentials sections on that page.
Run the example
Run the application with the command python3 light_sensor.py
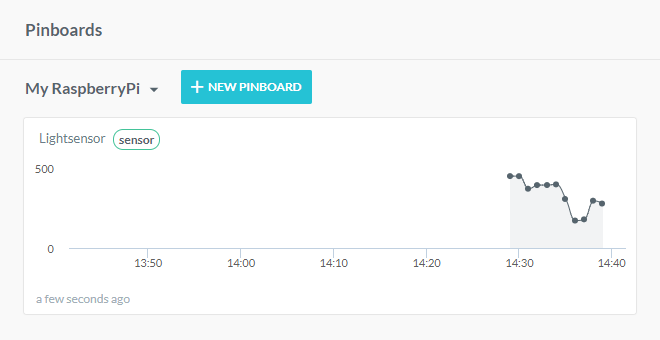
If all went well, a lightsensor asset is created under your device in AllThingsTalk Maker. Push the button and see if the value changes.
Next steps
Create pinboard
Upon running the example, all needed assets are created. We can now use those to create a pinboard to visualise them.
- On your device page hit the + CREATE PINBOARD button
- Edit the control to your liking
If you chose a (historical) chart, make sure you have Data Storage turned on!