LoRaWAN Track-and-Trace

The Track-and-Trace Product Kit has been pre-loaded with a demo sketch. Here we will show you how to get this demo running in no-time!
Connect your device
Connect your device
First please check how to create a LoRa device.
After you have created a device using the above link, connect your device to your computer with a USB cable. We will now use a terminal emulator to set up a serial connection with the device, using the correct COM port and baud rate.
Mac OS X
The default is Terminal which you can find in your Utilities folder
- Open the Terminal App
- To see a list of all available serial ports, typ
Ls /dev/tty.* - The port to which the LoRaWAN™ is connected should be /dev/tty.usbmodem1421
- Typ
screen <port-name> <baud_rate>to establish a simple serial connection,
for examplescreen /dev/tty.usbmodem1421 57600
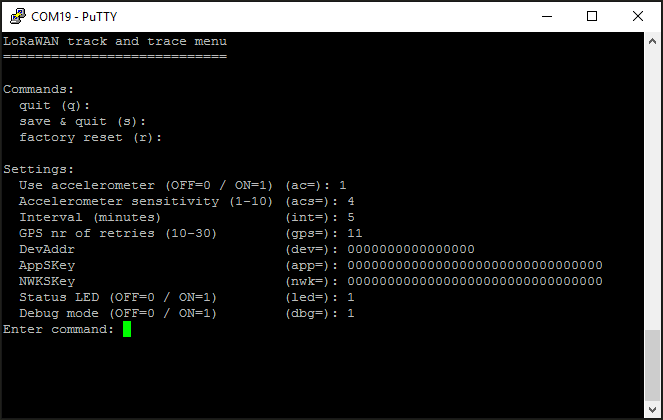
If all went well, you should now be connected and see the configuration menu of your Track-and-Trace device
Windows
First we need to know to which COM port our device is connected.
- Open a command prompt
- Type
powershellto get into powershell command mode - To see a list of all available serial ports, type
[System.IO.Ports.SerialPort]::getportnames()
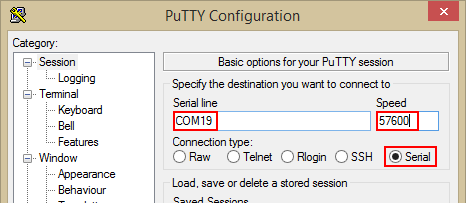
Next we will use PuTTy as a terminal emulator to show the settings menu and the communication of the device.
- Download PuTTy here. No need to install. You can run the downloaded file straight away
- Open PuTTy
- Select Serial
- Enter the correct COM port
- Enter the correct Baud rate (57600)
- Open
Regardless of the terminal tool you use, once the serial connection is established, you should see something similar to this
Configure your device
The LoRaWAN™ based Track-and-Trace device will enter into configuration mode
- when you press the button within 5 seconds after you power on the device
- or when no device keys are entered yet
Else the device will start running the demonstrator straight away.
Commands
qquit (this will start the demo application)ssave the current settings and quit the menu (this will start the demo application)rdo a factory reset. This resets all values to their default value
Settings
To run our demo, we need to fill in the credentials of our device. You can find them under 2. CONFIGURE YOUR DEVICE of the setup tab of your device in AllThingsTalk.
DEV_ADDR is the DEVEUI for your LoRaWAN™ based Track-and-Trace device. You can also find this key printed on the box of the product kitAPPSKEY is the application session key of your deviceNWKSKEY is the network session key of your device
Fill in these keys using the terminal. The commands to do so are between brackets in the Settings: menu.
Commands used are dev, app and nwk respectively.
For example to set the APPSKEY typ
Other parameters
Use accelerometer
There are 2 different modes
0accelerometer is not used. Interval for sending data is a fixed time interval1sending data is triggered by the accelerometer
Command ac, for example
Accelerometer sensitivity
Set the sensitivity of your accelerometer. Range between 1 and 10.
Command acs, for example
Interval
Time interval between sending of data in minutes.
Command int, for example
GPS nr of retries
Amount of retries the GPS module attempts to get a fix before giving up.
Command gps, for example
Run demo application
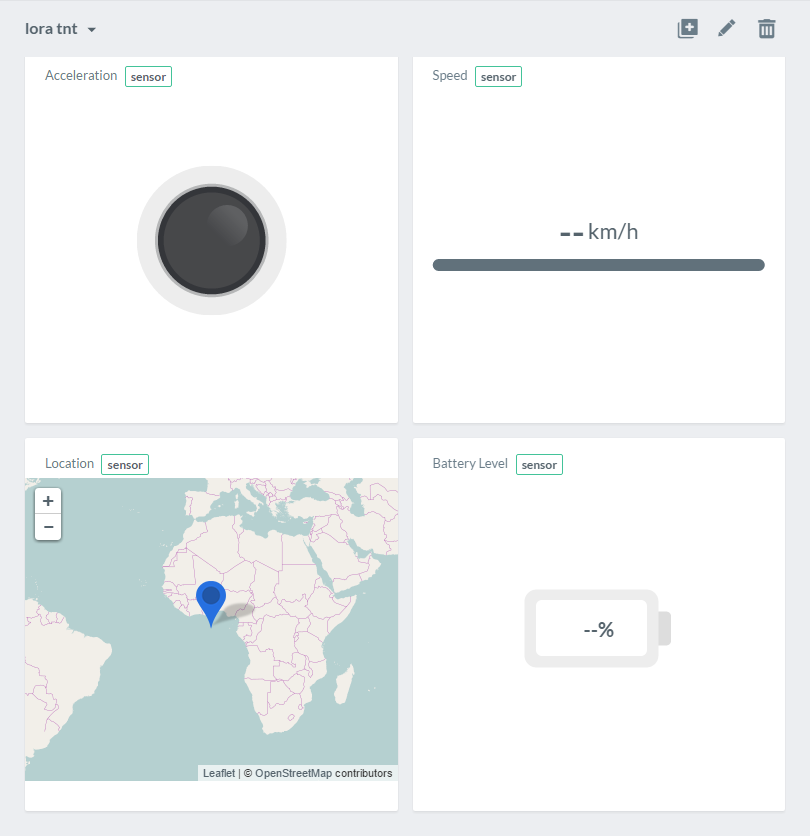
Create pinboard
To visualise your data, all you have to do is click the New pinboard icon. All pinned controls are preset for you!
For more information on pinboards, please check how to use pinboards.
Demo flow
Below you will find a description of the behaviour of the track-and-trace demonstrator. As explained under the accelerometer parameter, there are
two major modes to run your device in. Send GPS coordinates at a fixed interval or use the accelerometer to check and only send when we have acceleration.
No accelerometer (ac=0)

Start up
- Send battery level
Setup
- Every 30 seconds, up to
retriestimes or until a GPS fix is found- Try get GPS fix
- If fix is found, send coordinates to the AllThingsTalk cloud
- Go to sleep
Running
The following is repeated over and over:
- Wake up after
intervalminutes - Every 5 seconds, up to
retriestimes or until a GPS fix is found- Try get GPS fix
- If fix is found, send coordinates to the AllThingsTalk cloud
- Go to sleep
- Battery level is sent every 24h
With accelerometer (ac=1)

Similar Start up and Setup as above
Running
- First time wake up is when the accelerometer detects acceleration instead of after a fixed interval
The following is repeated over and over:
- On wake up, first check accelerometer
- If acceleration is detected, loop as above (find/send coordinates, go to sleep for fixed interval)
- If no acceleration is detected, go back to sleep until accelerometer detects acceleration