In this article
Light Sensor

An AllThingsTalk Experiment using a light sensor to measure environmental lumosity and show the result in a widget on your computer, displaying and interpreting the value in a lux scale.
For this experiment we use the Grove light sensor. It’s an ideal starter project to become familiar with the board, Grove and more importantly using the AllThingsTalk Maker to monitor and interpret real-time sensor values.
The experiment
Prerequisites
- AllThingsTalk Maker account, sign up here
- SD card with the AllThingsTalk library installed
Schematic and Ingredients

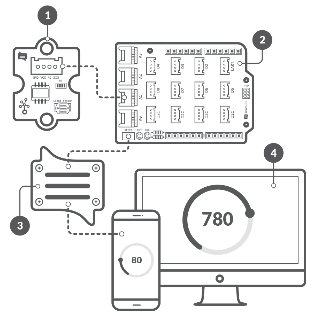
- Grove light sensor
- Raspberry Pi & GrovePi shield
- AllThingsTalk IoT Web App
- Android Device used as an IoT Device.
Basic knowledge of Raspberry Pi, if you’ve never used an Raspberry Pi before we suggest the setup guide.
- Raspberry PI
- 8 GB SD card
- Power supply
- Network cable
- Grove Shield
- Grove Light sensor
- AllThingsTalk Maker account
Building Plan
- Collect hardware
- Attach GrovePi shield to the Raspberry Pi
- Connect the Grove Light sensor to the A0 Grove connector on the shield
- Connect the ethernet cable to your Raspberry Pi
- Connect the power supply to the mains and your board
Create your device
First we need to create our device. Log in to AllThingsTalk Maker and navigate to the ground in which you want to create your device. Next follow these instructions.
If you just created a new account, you will have a default ground called playground setup for you. You can use this ground to create your devices.
Add credentials
Linux
When you have executed the previous task, an example of the lightsensor python application is already present on your Raspberry Pi.
- Login to the RaspBerry Pi using a SSH session or via the console (username: pi and password: raspberry)
- Navigate to the raspberrypi-python-client/experiments directory
- Edit the default demo file:
sudo nano lightsensor.py - Edit the script to connect to the device previously created. In the script, you will see 3 variables declared
1 | IOT.DeviceId = "" |
Copy and paste these credentails from the AllThingsTalk Maker into the script.
You find the device credentials under the SETUP tab of your device settings, which you can find behind the gear icon.
- Close and save the script. Press Ctrl+x. If asked to overwrite the file, hit Y and press Enter.
Windows 10
The Raspberry Pi will use C# applications which you write and modify on your computer.
You can find the light sensor application in the experiments folder of the libraries you downloaded to your computer.
- Open Visual Studio and go to the
MainPage.xaml.csfile in your project - Add your credentials
- ClientId
- ClientKey
- DeviceId
by changing the following line:
1 | _device = new Device("your client id", "your client key", _logger); |
You find the device credentials under the SETUP tab of your device settings, which you can find behind the gear icon.
- Save the application
Test your setup
Linux
Run the motionDetector script with the command sudo python lightsensor.py
If everything went ok, you should see some lines appear in the shell and after the python script has been executed, you should now see the assets created under your device in the AllThingsTalk Maker (you may need to refresh your screen).
Windows 10
To run the C# application, make sure you set the target device correctly in Visual Studio. Do this by entering the IP-address of your device as seen below.

Now simply hit Run and your application will start. You should now see the assets created under your device in AllThingsTalk Maker.

- Click on the Light sensor asset
- You should see a value. Try cover the sensor and watch it change.
Next steps
Create pinboard
To visualise our date, we will create a pinboard. For more information on pinboards, please check how to use pinboards.
- Select the Pinboards icon in the top left
- Select the New pinboard icon
- Select the Arrange pinboard icon to enter the pinboard edit mode
Now we will pin a control (visual representation) for our Light sensor asset.
- Select Pin control
- Select your Raspberry Pi device and the Light sensor
- Select the Historic Chart control
- Click Pin control
Note that you can pin the same asset multiple times. For example, pin the above asset again, this time using a label control. For some extra options to customise your controls, please check the Controls page.

