In this article
Raspberry Pi

This tutorial will help you set up your first working Raspberry Pi experiment. Simply follow these steps as you go.
We will use the raspberrypi-python-client/Shield_Demo.py of the AllThingsTalk Python client as our first example.
Linux
Software setup
To use your Raspberry Pi, you need an SD card with
- Raspian Wheezy (based on Debian Wheezy)
- AllThingsTalk Python client
installed
If you are using the AllThingsTalk Raspberry Pi starter kit, you don’t need to do anything. The SD card is pre-installed and you can go directly to the basic example or experiments.
Build SD card
Configure your SD card
If you’re starting from scratch, the Raspberry Pi has to boot the Raspbian Wheezy operating system from the SD card.
- Download latest Raspbian version
- Install the Raspbian operating system image on the SD Card. Instructions can be found on the Raspberry Pi site
- When the operating system is installed, insert the SD card into the Raspberry Pi
Connect Raspberry Pi to computer
- Connect your Raspberry Pi to the same local network as your computer with an ethernet cable
- Connect adapter and power up the Rapsberry Pi
- Connect to your Raspberry Pi using an SSH client
In this guide, we will use PuTTY to do so.
To connect with our SSH client, we need the IP address of our Raspberry Pi. There are several options to get this.
- Hook up a monitor to the Raspberry Pi
- Use an IP scanner, ex advanced IP scanner for Windows
- Scan for IP’s using a command line interface
Or check finding the IP address Raspberry Pi page for more information.
- Log on to your Raspberry Pi using the IP
Enter the default username and password
username pipassword raspberry
You will now enter the Command Line Interface of your Raspberry Pi
- Expand the file system so we can install our libraries using
sudo raspi-config
For more information about the config tool, please visit the Raspberry Pi documentation
- Reboot the Raspberry Pi when prompted to do so
Install AllThingsTalk library
Finally we need to install some libraries so we can use
- GrovePi
- AllThingsTalk
Follow these steps
- Connect to your Raspberry Pi using SSH as before
- Download the AllThingsTalk Python client using
git clone https://github.com/allthingstalk/raspberrypi-python-client - Change to the client directory on your Raspberry Pi with
cd raspberrypi-python-client - Setup shell
- If you use GrovePi shield
sudo bash setupGrovePi.sh - If you don’t have a GrovePi shield
sudo bash setupNoShield.sh
- If you use GrovePi shield
You will be prompted with a few questions during installation. Afterwards, the Raspberry Pi will reboot.
When done, you are ready to start using AllThingsTalk!
Our first Python program
Prerequisites
- AllThingsTalk Maker account, sign up here
- SD card with Debian Wheezy and the AllThingsTalk Python library installed
Ingredients
- Raspberry Pi board
- Grove shield
- LED
- Potentiometer (Rotary knob)
Building plan
- Collect hardware
- Attach Grove shield to your Raspberry Pi
- Connect LED to D4
- Connect Potentiometer to A0
- Connect the Raspberry Pi to your network with an ethernet cable
- Connect adapter to your Raspberry Pi for power
Create device
First we need to create our device. Log in to AllThingsTalk Maker and navigate to the ground in which you want to create your device. Next follow these instructions.
If you just created a new account, you will have a default ground called playground setup for you. You can use this ground to create your devices.
Copy sketch
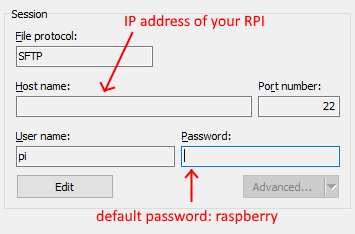
Download and copy the sketch to the Raspberry Pi. We will use a FTP connection for this. A program like WinSCP can set this up.
- Connect to your Raspberry Pi through SFTP

- Copy the sketch to the folder containing the ATT_IOT.py library file
We are now ready to run the demo script!
Test the demo script
- Connect to your Raspberry Pi using a SSH connection (for example by using PuTTY)
- Log in using the default username and password
username pipassword raspberry
- Browse to the folder with the demo script
- Run the script with the command
sudo python first_app.py
You can now watch the values change in AllThingsTalk Maker.
Toggle the LED or turn the knob and see what happens.
That’s it! You just made your first working IoT prototype!
Troubleshooting
So something has gone wrong. It happens but here’s a few things that can you help you debug what’s happening.
If things do not work as expected, let’s do some debugging and check a few things to troubleshoot and find the problem:
Verify Python Version
In your SSH session, run the python command. This will start a python shell that displays the version number It should be: Python 2.7.3 or higher. To exit python, press Ctrl+X.
If you get an error message or if it’s a lower version number, then you should re-install python.
You can do this with the following commands:
1 | sudo apt-get -y install python-dev python-pip |
Check Network Connection
Are you connected to the internet? Are the network LEDs flashing on your Raspberry Pi? Can you ping your device?
Check Raspberry Pi Environment
Is the Raspberry Pi connected correctly, did the libraries install ok?
Check Blinking LED Demo
You can run the ‘blinking-LED’ demo included with the Grove library to verify that the shield is working as expected. It uses an LED connected to the same pin as the AllThingsTalk demo, so you can leave the hardware in the same place.
To start this demo:
cd raspberrypi-python-client/GrovePi/Software/Python
sudo python ./grovepi_blink.py # (or 'grove_led_blink.py' depending on library)

#Press Ctrl+C to stop the demo
Verify Asset profile type
If the device appears to be ok in the web app, but no data appears to be arriving, even if you can see on the screen of the RPI that the application is sending data, then it’s best to check the data type that was assigned to the asset. If this is not the same as the data that you are uploading, then nothing will be saved and you wont see any updates.
For instance, if the asset is defined as an ‘int’, but you are sending the value ‘string1’ or ‘a text value’, then nothing will be stored as the platform is expecting to see an integer, not strings.
Windows 10
Software setup
- Install Visual Studio 2015 (to build and deploy your applications)
Prepare the environment
Microsoft provides a great step by step tutorial to get you started.
From putting the OS on the device to uploading your first application.
If you are using the AllThingsTalk Raspberry Pi Win10 starter kit, you can skip this step. The SD card is pre-installed with the OS.
Install AllThingsTalk library
It is best to install (and upgrade) the libraries from within Visual Studio itself with the nuget packet manager.
Simply right-click on your project and select manage nuget packages.

In the right pane, there is an actions drop down list where you can select to install, upgrade or remove it.
GrovePi
Using a GrovePi shield makes connecting your sensors and actuators much easier, which allows for faster prototyping.
GrovePi is already supported in the .net environment. You can install this library from nuget in the standard way (see above).
Here is a small code snippet on how to use the library in C#&35;:
1 | var led = DeviceFactory.Build.Led(Pin.DigitalPin2); |
Deployment
Deploying the application to your device is almost as easy, especially if you deploy from within Visual Studio.
This will copy your application to the RPI that was selected for debugging. If you want to deploy to a different machine, you will have to update
the IP address in the debug tab of the project properties (see above).
Deploying won’t automatically start your application! You’ll have to do one more step first to make it run automatically whenever the RPI boots up.
- Connect to your device using powershell
- Change the application that will run at boot by executing
IotStartup add headed <your app name>
For a complete list of all the available commands, check here.
That’s it to get your Raspberry Pi up and running with the AllThingsTalk client using Windows 10!
Our first C# program
Prerequisites
- AllThingsTalk Maker account, sign up here
- Windows computer with Visual Studio installed
- SD card with Windows 10 for IoT installed
Ingredients
- Raspberry Pi board
- Grove shield
- LED
- Push button
Building plan
- Collect hardware
- Attach Grove shield to your Raspberry Pi
- Connect LED to D4
- Connect Push Button to A0
- Connect the Raspberry Pi to your network with an ethernet cable
- Connect adapter to your Raspberry Pi for power
Create device
First we need to create our device. Log in to AllThingsTalk Maker and navigate to the ground in which you want to create your device. Next follow these instructions.
If you just created a new account, you will have a default ground called playground setup for you. You can use this ground to create your devices.
Add credentials
The Raspberry Pi will use C# applications which you write and modify on your computer.
You can find the example application in the Blinky - IOT folder of the libraries you downloaded to your computer.
- Open Visual Studio and go to the
MainPage.xaml.csfile in your project - Add your credentials
- ClientID
- ClientKey
- DeviceId
by changing the following line:
1 | _device = new Device("your client id", "your client key", _logger); |
You find the device credentials under the SETUP tab of your device settings, which you can find behind the gear icon.
- Save the application
We are now ready to run the demo application!
Test the demo application
To run the C# application, make sure you set the target device correctly in Visual Studio. Do this by entering the IP-address of your device as seen below.

Now simply hit Run and your application will start. The assets created under your device in the AllThingsTalk Maker.
Play with the assets (knob, button and LED) and see what happens!
That’s it! You just made your first working IoT prototype!
Extra info
Debugging
Running your application in debug mode is really easy:
make certain that you have filled in the IP address of your RPI:
- Open your project properties
- Go to the debug tab
- Fill in the IP address under remote machine
press F5 to run your app in remote debug mode.

When debugging, make certain that your application isn’t already running on the RPI (for instance, when you previously did a deploy). This wont work. You’ll have to stop all other instances first.
